How To Install Floor Tiles In Bathroom? - A Step By Step Guide
One of the most resilient, moisture-resistant, and attractive floor solutions for bathrooms is Tiles! The good thing about Tiles is that they are affordable, durable, modern & easy to install! Even you can DIY it for your bathroom! Bathroom flooring with Tiles looks stunning and will perform better for many years.
Ceramic or Stone is not a better option when it comes to longevity and aesthetics! When installed properly, floor tile lasts longer, & needs very little to zero cleaning & maintenance! Additionally, you can also choose from thousands of varieties from a wide variety of color combinations and textures.
Equally appealing is the fact that you can install high-quality tile yourself and save hundreds of rupees also! Yes! You can Lay Tiles in the bathroom if you're confident with simple hand tools and have the patience to position the tiles precisely.
Let’s dig out for more!
Things You Need To Know Before Install Tiles in Bathroom
-
The fact that bathroom tiling is often a modest project and allows you to work slowly to rub your tiling abilities is one of the finest things about it.
-
However, a lot of focus is placed on bathroom flooring. Any errors you make will be obvious every day.
-
Another important element to consider is humidity.
-
The highest level of floor waterproofing seen in a home is needed when tiling a bathroom floor, short of a shower pan.
-
Tools and supplies for tiling might be useful.
-
The cabinet and shower/bathtub do not need to be removed if you are simply tiling your bathroom and making no other alterations; you may tile up to the edge.
-
If you're remodeling the bathroom entirely, you might want to tile below the cabinet since it will allow you to make modifications later without having to redo the floor.
-
Always lay in the tile before the installtion of the toilet.
-
Take out as many as things possible from the bathroom. If possible, take the toilet out. Detach the baseboards.
-
Remove the door jambs if possible; if not, you can undercut them afterwards.
Safety Tips
-
Operating a wet instrument can be risky, always wear protective shoes & gloves before working on a wet floor.
Tools That Are Required To Install Tiles in Shower
-
Tile trowel
-
Chalk snap line or another levelling tool
-
Tiles cutting tool
-
Tile saw
-
Marker
-
Spacers
-
Bucket
Steps To Install Bathroom Tiles
Step 1: Get the subfloor ready.
-
The subfloor in the bathroom needs to be level, flat, and damage-free.
-
You can discover water damage near the shower/tub, toilet, and sink while repairing an old bathroom.
-
Subfloor damage should be repaired using similar materials.
-
If the subfloor has low places or slight dips but does not require replacement, mix and apply a floor levelling compound to those areas, then wait for it to fully cure.
Step 2: Design the tile pattern
-
You may pick from a variety of tile patterns, including grid, brickwork, and diagonal, depending on the bathroom's size, design, and kind of tile.
-
Use the vertical line function of the laser level or the chalk snap line to draw a line along the middle of the space.
-
To find the centre, use the tape measure.
Step 3: Dry-fit the tile arrangement.
Work from the middle line outward while dry-fitting your tiles. Try out a few different postures. Full-size, uncut tiles should be used in the areas that are the most noticeable.
Step 4: Make the Cutting for Door Post
-
If the door jambs are still in place, set a tile on top of a thin cardboard spacer.
-
With a pencil, mark the door jambs.
-
After removing the tile and spacer, use the multi-tool to cut the door jambs.
Step 5: Fill in the Tile Gaps
-
If using a dry mix, combine the thinset in a bucket.
-
Fill the voids in the tile membrane with thinset mortar using the straight, unnotched side of the trowel.
-
Thinset is used to install the tiles.
-
Spread thinset mortar over a small area of the floor using the trowel's notched edge.
-
Additionally, use the thinset to butter the back of a tile.
-
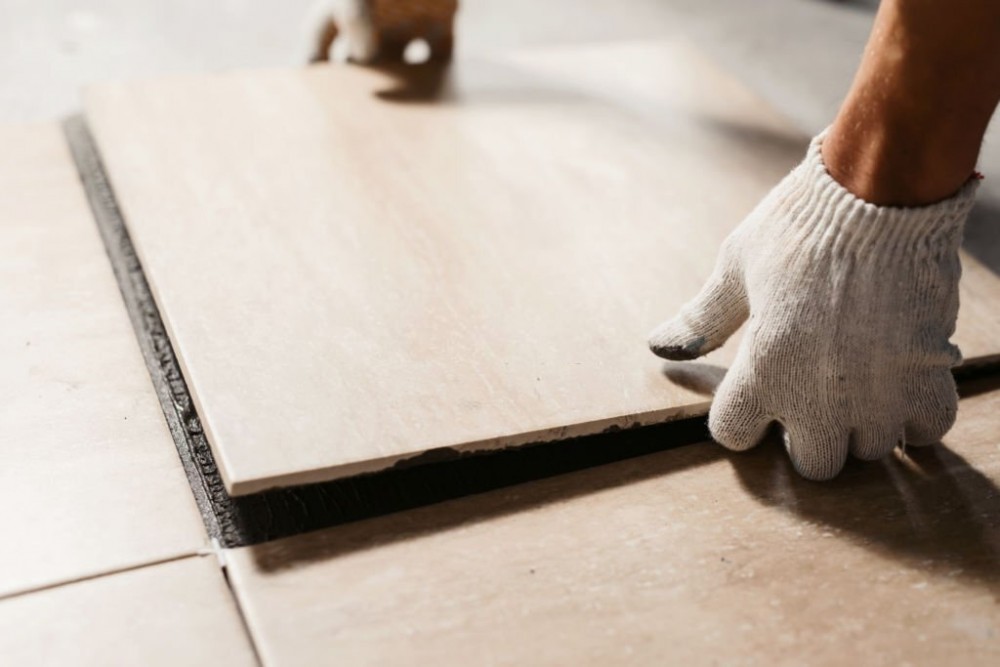
Firmly press the tile into the ground.
-
Insert tile spacers as you move on to neighbouring tiles.
Step 6: Cut the tile
-
Cut the tile to the appropriate size as you go with the installation. A tile cutter can be used to cut edge tiles.
-
A tile nipper may be used to cut field tile cutouts, specifically for the toilet.
Step 7: Put tile grout on
-
Apply the tile grout with the rubber grout float after the tile has fully dried (approximately 24 to 48 hours).
-
Draw the float firmly in your direction, across the squares diagonally.
Step 8: Get Rid of the Haze
-
Add grout cleaner to the pail of cool water once the grout has dried.
-
Utilize the tile sponge to remove the grout haze from the tile surface.
Step 9: Lock Up the Grout
-
Apply grout sealant once the tile has cured.
-
This will stop water from seeping beneath the tiles and through the tile seams.
FAQ
1. Is it OK to use large tiles in a small bathroom?
Yes! Large tiles are definitely suitable for your new shower. In fact, a big tile might be advantageous in a tiny bathroom. The walls and floor are less congested and the room appears larger with fewer grout lines.
2. How far up the bathroom wall should I tile?
The standard height of the traditional design element is 36 inches, ranging from 34 to 54 inches high. For this wall height, a traditional offset or straight set design in a typical field-size tile is ideal. Finish the top with ornamental trim or a bull-nosed edge for a genuinely timeless appearance.
3. Should floor tiles be darker than walls?
The floor color should be darker than the walls, according to several house experts. The concept often holds true because a room appears larger when its walls are brighter and its floor is darker. Most house owners choose an interior that appears roomy. Low ceilings, however, can alter the norm.
4. Do you tile behind shower door?
You should tile on top of the tray even though some manuals may suggest doing so beneath the shower walls. In order to finish the bathroom's shower area quickly, tiling and plastering might be done simultaneously.
5. Should a bathroom be fully tiled?
There is no "correct" approach, which is the response. It is not a case of totally tiled being preferable to partially tiled. Instead, these are unique yet excellent methods to adorn the walls of your bathroom.
There are now alternate materials to add ornamental, waterproofing to bathroom walls instead of the traditional practise of using tiles in damp regions of bathrooms.
Article Updated:- June 30, 2022
Read More Articles: